3.3: Rays, Scenes, and the Camera
- Download code
- 03-tracer.zip
- Live example
- examples/03-tracer/index.html
In this module, we’ll introduce three more concepts, that should get us to the point where we can render an empty scene. (Hey, we gotta start somewhere, right?)
Ray
Ray-tracers work by tracing rays – modelling individual rays of light that bounce around our scene, interacting with shapes, lights and shadows.
In this module, we’ll create the Ray class that we use to model one of these light rays.
Add a new file to your project called modules/ray.js, which looks like this:
// modules/ray.js

export class Ray {
    /** Construct a new ray starting from the specified start
     * point, and pointing in the specified direction */
    constructor(start, direction) {
        this.start = start;
        this.direction = direction.unit();
    }
    /** Trace this ray through the specified scene, and return the resulting color. */
    trace = (scene) => scene.background;

    toString = () => `ray: <${this.start.toString()}> => <${this.direction.toString()}>`;
}
A ray is defined by two properties:
start- the starting point (where did the ray come from?)direction- which way is the ray pointing?
These properties are both vectors – which might seem a little odd, but remember that a vector’s <x,y,z> coordinates can represent a point in space, relative to the origin <0,0,0>, but they can also represent a direction - how far have we moved in each dimension of our coordinate system?
Ray also defines a method called trace, which traces the ray through a scene and tells us what color it ends up.
We’re going to give each scene a background color, which is the “default” color - any ray which doesn’t hit an object will end up as the background color. And because we haven’t implemented any shapes yet, all we can do for now is render the background color, which may not seem like much, but it’s a significant step towards rendering actual scenes.
Scene
Add a new file to your project called modules/scene.js, which looks like this:
// modules/scene.js

import { Color } from './color.js';

export class Scene {
    constructor(camera, background) {
        this.camera = camera;
        this.background = background ?? Color.Black;
    }
    trace = (x, y) => this.camera.trace(this, x, y);
}
For now, the only things in our scene are a camera, and a background color.
Camera
Add a new file to your project called modules/camera.js, which looks like this:
// modules/camera.js

import { Vector } from './vector.js';
import { Ray } from './ray.js';

export class Camera {
    constructor(location, look_at, width = 4, height = 9/4) {
        this.location = location;
        this.look_at = look_at;

        // If the camera is DIRECTLY above the look_at point, things go weird, so
        // we nudge it backwards ever so slightly...
        if (this.location.x == this.look_at.x && this.location.x == this.look_at.z) {
            this.location = this.location.add(new Vector(0,0,-0.0000001));
        }

        // Calculate the direction - the vector pointing at the centre of the "frame"
        this.direction = Vector.from(this.location).to(this.look_at).unit();

        //  then work out which way is "right" and "up" relative to the camera
        this.right = Vector.Y.cross(this.direction).unit().scale(width / 2);
        this.up = this.right.cross(this.direction).invert().unit().scale(height / 2);
    }

    trace(scene, x, y) {
        let vx = this.right.scale(x);
        let vy = this.up.scale(y).invert();
        let r = this.direction.add(vx).add(vy);
        let ray = new Ray(this.location, r);
        return ray.trace(scene);
    }
}
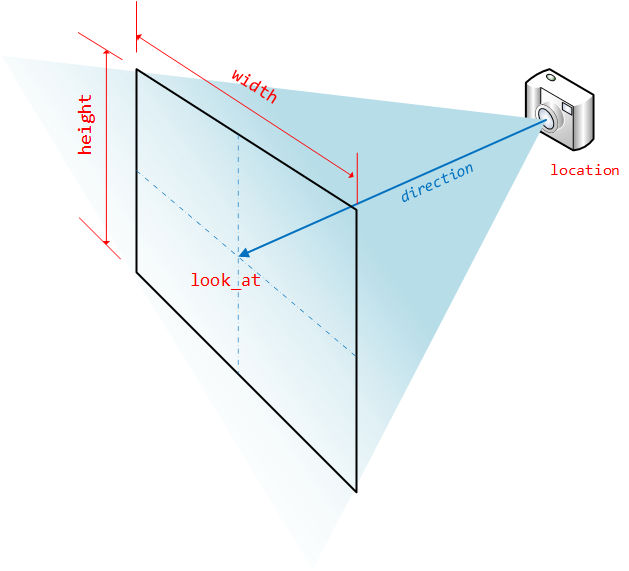
We create a camera by specifying two vectors:
location- where the camera is located in our scenelook_at- what is the camera pointing at?
There’s some pretty complicated code in the constructor for the camera class; this takes the location and look_at vectors and calculates exactly what the camera can “see”. By default, the camera is positioned by rotating it around the Y-axis until it’s pointing toward the look_at point, and then angled up or down until it’s pointing in the right direction.
There’s a tiny fudge in here, because if the camera is directly above the look_at point, trying to position it results in a divide-by-zero error, so if this happens we nudge the camera backwards along the Z-axis by a tiny amount – we actually use the
THRESHOLDamount defined earlier insettings.js
There are two additional arguments, width and height, which control the field of view of the camera.
Imagine holding a rectangular frame in front of your camera. We’re going to render everything that’s visible through the frame. The frame is width units wide and height units high, and centred at thelook_at coordinate. If the camera location is close to the look_at, we get a very wide field of view (and shapes at the edges of our frame will appear more distorted). If the location is further away from the frame, we get a narrow field of view.
The trace(scene,x,y) method takes a scene, and the x- and y- coordinates of the point we’re tracing; it works out what direction that ray will be going in, and then calls ray.trace
The camera works in world coordinates, so X and Y here are a position on the “viewport” – they are NOT the x/y pixel coordinates of our HTML canvas.
Review & Recap
- We’ve introduced a
THRESHOLDsetting, to work around inaccuracies caused by floating-point arithmetic. - We’ve introduced a
Rayclass to model a single ray of light - We’ve introduced a
Sceneclass, to model the scene which we’re rendering. At the moment, scenes are empty except for a background color. - We’ve introduced
Camera, which has alocationand alook_atvalue, controlling where the camera is and which way it’s pointing. (OK, and also a bunch of complicated vector arithmetic to work out which way is ‘up’…)
- Download code
- 03-tracer.zip
- Live example
- examples/03-tracer/index.html