Module 8: Snowpack
So far, everything we’ve seen in this course is code that runs in the browser. The sections using ES modules required a proper web server, rather than just a local folder, but even then the server is only serving static content; it’s the browser that’s responsible for downloading the modules, resolving the dependencies, and running our code. That’s a deployment model I like a lot – because it means you can host your web apps just about anywhere. GitHub Pages provides free hosting for static sites; you can host static content on AWS using a public S3 bucket, and all that you need to do is host the files.
We’re going to stick with that model, but so far we’ve also written all of our code by hand – HTML tags, JavaScript classes, CSS rules. In this section, we’re going to look at some tools that give us more power and control when it comes to creating the files that we’ll eventually deploy to our production server.
Installing Snowpack
Snowpack is a “modern, lightweight tool for faster web development”. Once we’ve added Snowpack to our project, we’ll be able to take advantage of some very cool features.
Snowpack requires nodeJS and a nodeJS package manager. These instructions are based on the Snowpack Quick Start; I’m running nodeJS v14.16 on Windows 10, with yarn as my package manager.
ℹ If you’ve already got nodeJS set up with a different package manager such as npm or pnpm, refer to the Snowpack documentation for how to install Snowpack on your particular system.
For this exercise, we’ll use the completed code from the component architecture exercises. If you need it, you can download the starting code from here:
Download the code: counter.zip
First, we’ll use yarn init to initialise our project and create the package.json file. Use --yes to accept all the defaults when creating a new project:
yarn init --yes
Next, we add snowpack to our project, specifying --dev because it’s a development-time dependency, not something we’re going to ship to production:
yarn add --dev snowpack
Next, initialise Snowpack:
yarn snowpack init
Finally, we’re going to edit package.json so that then yarn start command will run the Snowpack local development server. Add a scripts block to package.json as follows:
{
  "name": "counter",
  "version": "1.0.0",
  "main": "index.js",
  "license": "MIT",
+ "scripts": {
+  "start": "snowpack dev"
+ },
  "devDependencies": {
    "snowpack": "^3.3.5"
  }
}
Once that’s done, you should be able to start the snowpack server by typing yarn start:
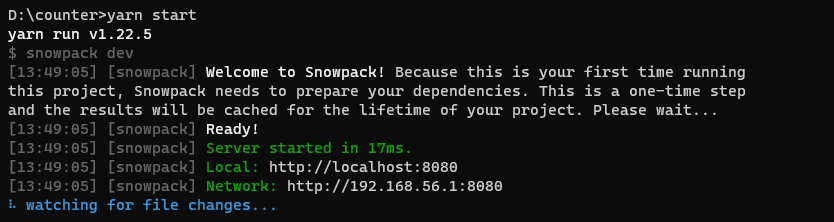
Open up http://localhost:8080/ in a browser, and you should see our component page.
Hot Module Replacement
One of the coolest things about Snowpack is a feature called “hot module replacement” (HMR). Try it out now. With your web browser open, add something to the index.html file in the counter example and save the file. The browser will update immediately - no Ctrl-R or F5 required.
If you take a look at the page source of index.html that’s being served to the browser, you’ll see that Snowpack has injected three <script> tags into the head of our page:
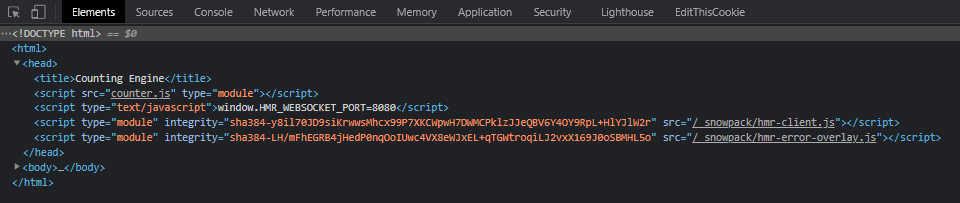
HMR uses a web socket to maintain a live connection between our browser and the Snowpack dev server. As soon as Snowpack detects a change to any file in our project, it will trigger an automatic browser refresh.
Try making changes to various files in the project and seeing how fast they show up in your browser.
ℹ Hot module replacement was first developed as part of Webpack, another popular frontend build tool. What makes Snowpack unique is that, in the default configuration, it doesn’t rebuild or process any of your files. Because we’re using ES modules natively in the browser, there isn’t any “build” step for our project – Snowpack just signals the browser “hey, reload all the things!”, and allows the browser’s own cache validation logic to figure out exactly what needs to be reloaded.
Snowpack HMR and runtime errors
Try deliberately introducing an error into the code that’s attached to one of your event handlers:
// counting-engine.js
increment() {
    this.count++;
    // deliberate call to a method that doesn't exist:
    no_such_method();
}
Now see what happens when you try to increment the counter:
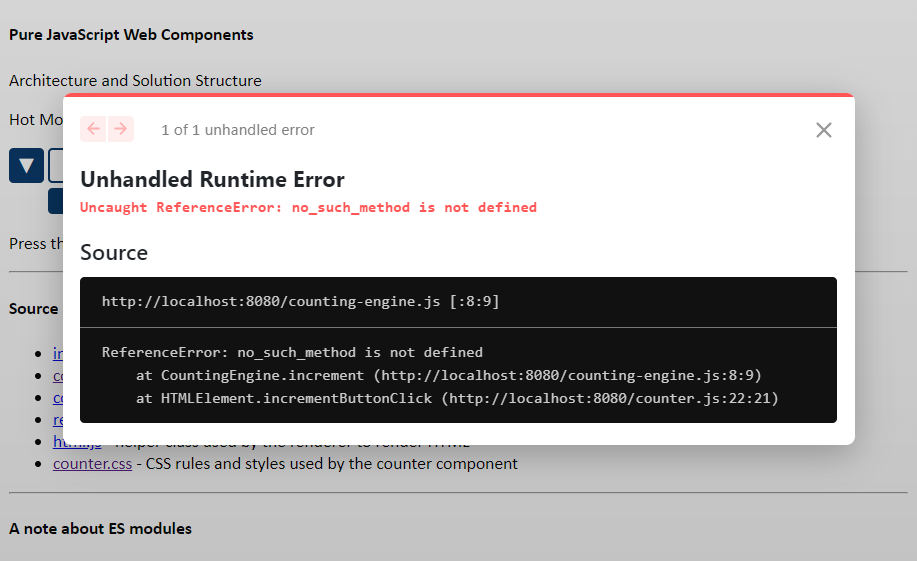
I like that. 😁
Snowpack, npm packages and version control
If you’ve not worked with node modules and tools like Snowpack before, you might be surprised at how many files and folders have been added to your project. Well, that’s how modern JavaScript works. But if you’re using a revision control system like Git, you should know which folders should be added to version control.
You should add these files to your revision control:
✅ package.json – controls which packages have been added to your project, and the scripts you will use to build and run your code.
✅ yarn.lock – controls which exact versions of which packages are installed. (If you’re using npm, the equivalent is package-lock.json)
✅ snowpack.config.js – this is the Snowpack configuration for your project. Keep it. It’s important.
You should exclude these files from revision control:
❌node_modules/* – this is where the actual modules and library code has been downloaded to your machine.
Most of the time, you should not check node_modules in to source control; it can easily run to hundreds of megabytes on a project, and it can always be recreated by running yarn install or npm install, as long as you have the package.json and corresponding lock file available.
Snowpack: Review and Recap
- Snowpack is a frontend build tool for web applications
- Out of the box, it provides a development web server that offers hot module replacement and improved runtime error notifications
- Snowpack is available as an npm package, so you’ll need nodeJS and a package manager such as yarn, npm or pnpm to install it.
Links and References
- The official Snowpack site is at snowpack.dev
- Why and how to use Snowpack instead of webpack by Pam Lu