Module 4: Events and Event Handlers
Back in the earliest days of the web, many developers took their first steps with JavaScript by adding a mouseover effect to something on their page… this was amazingly cool back in 1996, and although these kinds of hover effects are normally handled using CSS now, the same code still works in just about every browser:
<a href="#" onmouseover="this.style.color = 'red';" onmouseout="this.style.color = '';">hover over me!</a>
JavaScript events are the fundamental interaction model of web content, and modern browser APIs can handle much more than simple mouseover effects. In this module, we’ll look at how to work with built-in events for handling click, keypress and touch events, how to create your own events, and some of the complexities of using events in web components.
Attaching event handlers
Let’s say we want to add a button to our web page that will pop up a “Hello, World!” message. There are several different methods we can use to achieve this.
Inline event handlers
The oldest, and simplest, way to attach an event handler was to write the JavaScript code directly into the HTML attribute:
<button id="button-1" onclick="alert('Hello, World!');">Button 1</button>
Try it:
Inline handlers can also call functions defined in a <script> block:
<button id="button-2" onclick="helloWorld();">Button 1</button>

<script>
function helloWorld() {
    alert('Hello, World!');
}
</script>
Try it:
These approaches will still work, but they can quickly become unmanageable if you’re building complex applications with lots of UI elements and interactions.
Attaching handlers with element.onevent
Most HTML elements expose a set of handler functions with names like onclick, onchange, etc; you can assign your own handler functions directly to these events:
function helloWorld() { window.alert('Hello, World!'); }
let button3 = document.getElementById('button-3');
button3.onclick = helloWorld;
Try it:
Attaching handlers with element.addEventListener
The recommended way to work with events and handlers in modern JavaScript is via something called the eventTarget API, which exposes a method called addEventListener. This provides a powerful and flexible method for managing handlers for built-in events, and as we’ll see later in this section, we can also extend it to work with our own custom events.
function helloWorld() { window.alert('Hello, World!'); }
let button4 = document.getElementById('button-4');
button4.addEventListener('click', helloWorld);
Try it:
Event Bubbling
Every event in JavaScript has a target - the element that actually triggered the event. If you click a link, the browser raises a click event, and the event.target of that event is the button that was clicked.
Multiple elements can attach handlers to the same event, though, thanks to something called event bubbling:
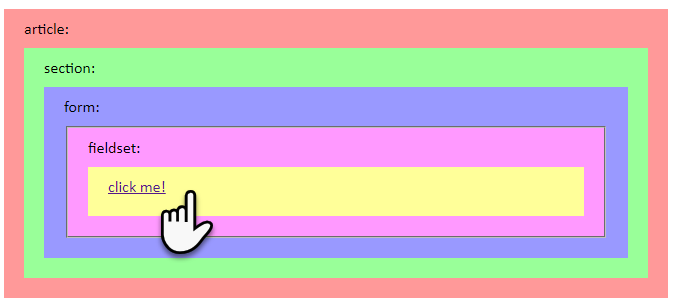
Here, we have a link, inside a fieldset, inside a form, inside a section, inside an article - and we’re going to attach click event handlers to all of these elements:
['my-article', 'my-section', 'my-form', 'my-fieldset', 'my-link'].forEach(function (id) {
	document.getElementById(id).addEventListener('click', handleClick);
});
When we click any of those elements, the click event will bubble up the element stack, starting from the deepest element and bubbling up until it raises a click event on the document body itself.
Try it live: event-bubbling.html
In this example, the event handler looks like this:
function handleClick(event) {
    console.log(`handler: ${this.tagName}`);
    console.log(`target: ${event.target.tagName}`);
}
If you look at the browser console, you can see that event.target will always be the element that was clicked, but the this variable inside the event handler refers to the element that’s currently handling that event.
If you don’t want an event to bubble up the stack like this, you can call event.stopPropagation() inside your handler - you can try this out in event-bubbling.html.
⚠ Lots of web analytics tools will track user behaviour by attaching a
clickevent to the document body, so you can see which areas of your page your visitors are clicking on. Be careful usingevent.stopPropagation()if you’re using any kind of analytics or behaviour tracking on your sites, since if you stop your events propagating, the analytics tool will no longer receive those events and so won’t be able to track them.
What about event capturing?
You’ll see articles online that talk about something called event capturing. When the browser receives something like a click event, that event actually starts from the top of the DOM tree - so the first element to receive the click is the document body; the event works its way down the DOM stack until it reaches the event target (this is known as the capturing phase). The event reaches the target (the target phase), and then bubbles back up to the top of the DOM stack again (the bubbling phase).
If you do need to handle events during the capturing phase, you need to pass a third parameter to the addEventListener method:
// normal event handler; will only fire during the target and bubble phases
myElement.addEventListener("click", handleClick);

// capturing event handler: will fire during the capture phase
myElement.addEventListener("click", handleClick, { capture: true });

// shorthand syntax for capturing event handlers
myElement.addEventListener("click", handleClick, true);
You can see how this works in event-capturing.html, but don’t worry about it too much. It’s worth knowing that it exists, event capturing is relatively obscure, and not something you’re likely to need for building web components.
Handling mouse and keyboard events
Mouse and keyboard input events fall into three different categories.
At one level, you can capture events like mousedown/mouseup and keydown/keyup – this allows you to capture the exact moment that the user presses a mouse button or presses a key, and is useful for building control systems for games and other interactive applications. However, if you’re handling the raw down/up events, something like detecting a mouse double-click can be complicated.
At a slightly higher level, there are events like dblclick, which fires when an element is double-clicked with the mouse.
ℹ Most operating systems will allow the user to change things like the speed of a double-click event; users who are mobility impaired or who use assistive devices will often adjust these settings to make their devices easier to work with. Events like
dblclickwill respect the operating system settings, so you should always use these higher-level events when you can.
Finally, there are the device-agnostic events such as pointerdown. On a desktop PC with a mouse, pointerdown will fire when a mouse button is pressed down, but on a touchscreen device, it’s fired when the user’s finger makes contact with the screen, and on a stylus device, it’ll fire when the user touches the stylus to the screen.
Keyboard events demo
Open keyboards-events.html to see a live demo of handling keyboard events from JavaScript, and the kinds of properties exposed by the Event object for keyboard events.
Try it live: keyboards-events.html
Keys, Codes and Keycodes
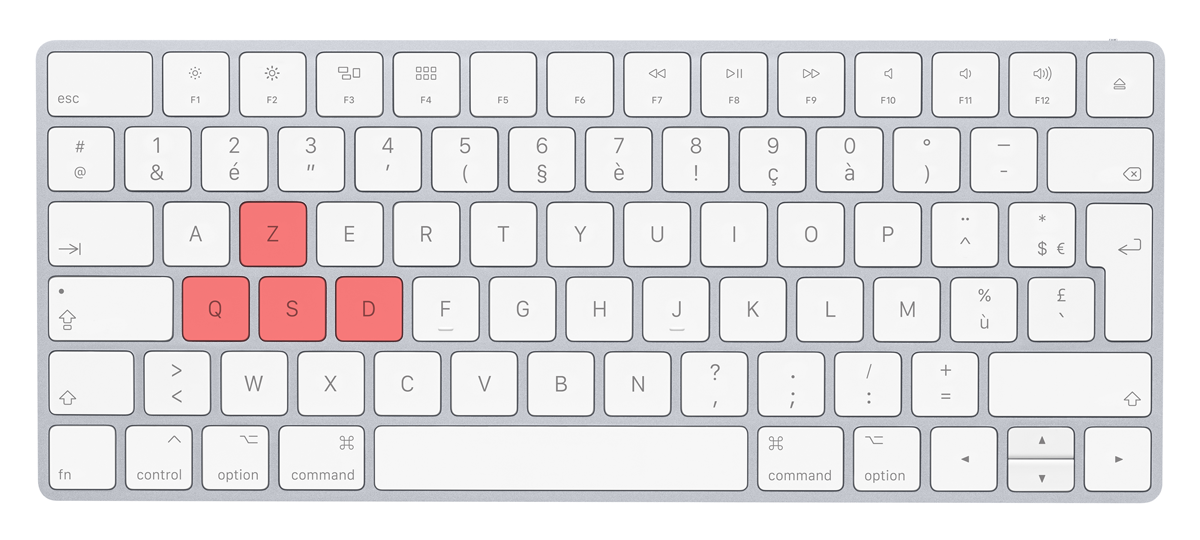
Historically, when handling keyboard events in JavaScript, you’d use the keyCode property to determine which key had been pressed, but this caused problems with some non-standard keyboard layouts. For example, many games use the WASD key cluster instead of the arrow keys - but on a French language keyboard, the “WASD” cluster is actually the keys labelled Z, Q, S and D:
Keyboard events in JavaScript now expose two separate properties:
event.codeis the physical key that was pressed, as a string value such as"Escape","Digit0"or"KeyA". Refer to this page on MDN for a complete list of keyboard event codes.event.keyis the logical key that was pressed, accounting for locales, modifier keys and keyboard layouts.
For example, typing an uppercase ‘Ф’ on a Ukrainian keyboard layout will raise a keyboard event with the following properties:
keyCode:   65
code:      "KeyA"
key:       "Ф"
shiftKey:  true
If you’re using the keyboard for text input, use event.key. If you’re using the keyboard as a control surface for something like a game, use event.code.
Mouse events demo
Open mouse-events.html to see a live demo of handling mouse events from JavaScript, and the kinds of properties exposed by the Event object for mouse events.
- Mouse event support can vary across browsers and devices. I have a Microsoft 5-button mouse. Left- and right-click both raise the expected events in JavaScript, and I can detect click events from buttons 4 and 5, but I have never been able to detect a middle-click event from JavaScript on any browser.
- Many mouse events are wired into native browser functions, such as right-clicking to open the browser context menu; if you want to use these events in your own apps, you’ll need to use
event.preventDefault()to stop them triggering the built-in behaviour. You might also need to hook into events likedocument.oncontextmenuand attach a handler to these events which willpreventDefaultto override their default behaviour.
Try it live: mouse-events.html
Working with Custom Events
The web component object model also allows us to define, raise and handle our own events, which lets us wire up behaviour between our components in terms of meaningful domain events instead of keystrokes and mouse clicks.
To raise a custom event from within a web component, we use this syntax:
let detail = { /* some custom information about your event */ };
let customEvent = new CustomEvent('custom-event-name', { bubbles: true, detail: detail });
this.dispatchEvent(customEvent);
and to attach a handler from the host page, we use this:
let myComponent = document.getElementById('my-component-id');
myComponent.addEventListener('custom-event-name', function(e) {
    // do something useful with e.detail here.
});
Let’s look at more complex example. We’re going to build a color picker control, and then wire it into our page via a custom event.
Here’s the code for our color picker component:
// color-picker.js
class ColorPickerElement extends HTMLElement {
    constructor() {
        super();
        this.attachShadow({ mode: 'open' });

        let style = document.createElement('style');
        style.innerHTML = `button { width: 32px; height: 32px; border: 1px solid #fff; border-radius: 16px; cursor: pointer;  } button:focus { outline: none; }`;
        this.shadowRoot.appendChild(style);

        let div = document.createElement('div');
        this.drawPicker(div, this);
        this.shadowRoot.appendChild(div);
    }

    drawPicker(div, picker) {
        let colors = ["#50c236", "#16856f", "#efc306", "#025594", "#b51f8f", "#ff6c53", "#a85642"];
        colors.forEach(c => {
            let button = document.createElement('button');
            button.style.backgroundColor = c;
            button.addEventListener("click", function (clickEvent) {
                const outerEvent = new CustomEvent('pick-color', { bubbles: true, detail: c });
                picker.dispatchEvent(outerEvent);
            });
            div.appendChild(button);
        });
    }
}
window.customElements.define('color-picker', ColorPickerElement);
And here’s the page where we’re using it:
<!DOCTYPE html>
<html>
<head>
    <title>Web Components: Custom Events</title>
    <script src="color-picker.js"></script>
</head>
<body>
    <h1 id="the-headline">This is the headline. Click below to change the color.</h1>
    <color-picker id="color-picker"></color-picker>
<script>
    var picker = document.getElementById('color-picker');
    picker.addEventListener("pick-color", function(e) {
        document.getElementById('the-headline').style.color = e.detail;
    });
</script>
</body>
Exercise: Working with Custom Events
Extend the color picker so that if you right-click a color swatch, it will change the background color of the headline. You will need to:
- Modify the color picker component so that it detects which mouse button was clicked.
- You may also need to prevent the right-click event’s default behaviour, otherwise it will open the browser context menu when you click it.
- If you’re running macOS, figure out how to detect a Ctrl-Click event.
- Extend the custom pick-color event so that the detail includes not just the colour code, but also whether it’s a foreground or background color.
- Modify the event handler to set the
backgroundColorproperty if the event is a background color pick event.
References and Further Reading
- Event documentation at MDN
- Introduction to browser events at javascript.info