7: Putting it All Together
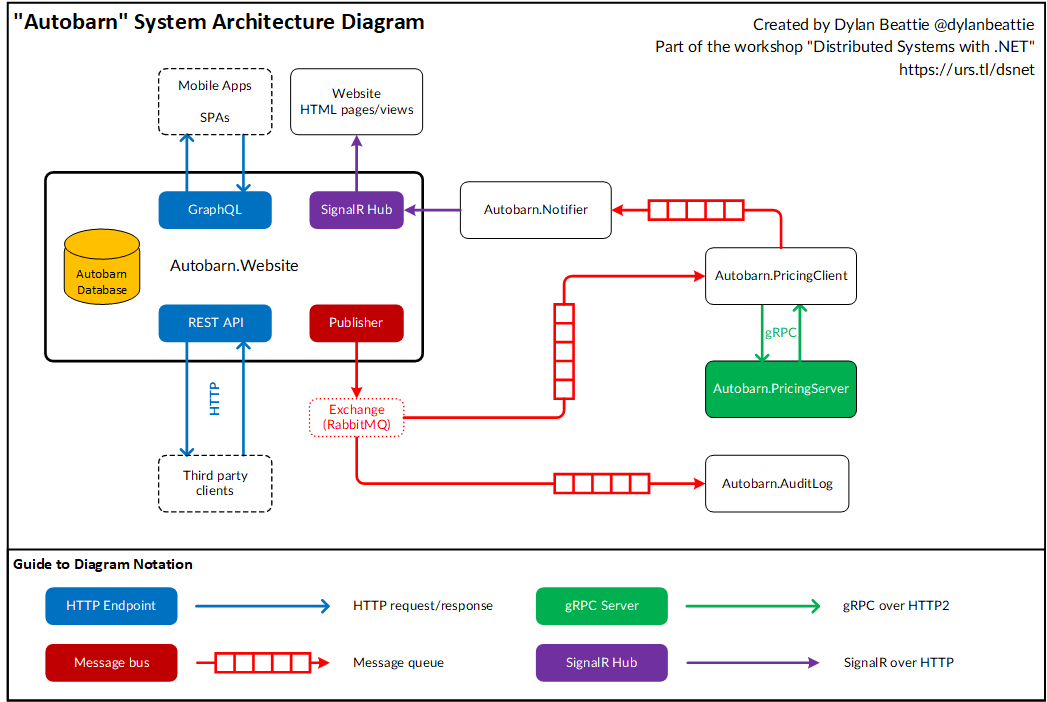
In the final part of the workshop, we’re going to combine all the patterns and protocols we’ve seen so far to create a distributed application that will notify users when a new car is advertised for sale.
- A new vehicle is added to the platform via the REST API
- The web app publishes a notification using pub/sub and EasyNetQ
- A subscriber receives that notification, uses the gRPC service to calculate a price, and then publishes a NewVehiclePriceMessage
- Another subscriber receives that message, translates it into a SignalR notification, and pushes it to the SignalR hub running in our web application.
Our completed application will look like this:

High quality version: autobarn-architecture-diagram.pdf
To implement this system, we’re going to modify components we’ve created over the course of the workshop.
Autobarn.Messages
We need to add a new class to our shared Autobarn.Messages assembly, so we can publish notifications about a vehicle price calculation. This class will inherit from our existing NewVehicleMessage class, and add new fields for the vehicle price and currency.
Add a new class NewVehiclePriceMessage to the Autobarn.Messages project, with the following code:
namespace Autobarn.Messages {
	public class NewVehiclePriceMessage : NewVehicleMessage {
		public int Price { get; set; }
		public string CurrencyCode { get; set; }
	}
}
We’ll also add an extension helper method to make it easier to translate NewVehicleMessage objects into NewVehiclePriceMessage objects:
public static class MessageExtensions {
	public static NewVehiclePriceMessage ToNewVehiclePriceMessage(this NewVehicleMessage incomingMessage, int price,
		string currencyCode) {
		return new NewVehiclePriceMessage {
			Manufacturer = incomingMessage.Manufacturer,
			ModelCode = incomingMessage.ModelCode,
			Color = incomingMessage.Color,
			ModelName = incomingMessage.ModelName,
			Registration = incomingMessage.Registration,
			Year = incomingMessage.Year,
			CurrencyCode = currencyCode,
			Price = price
		};
	}
}
ℹ If you find yourself doing this a lot in your applications, check out AutoMapper, which makes it really easy to map data between objects with similar structures and fields.
Autobarn.PricingClient
We need to modify the PricingClient so that it will subscribe to messages published from our web app.
First, you’ll need to add the EasyNetQ NuGet package:
dotnet add package EasyNetQ
Now, we need to modify Program.cs so that it will:
- Subscribe to
NewVehicleMessagemessages - When a
NewVehicleMessagearrives, it will create a newPriceRequestand send this to thePricingServergRPC endpoint - When the
PriceReplycomes back, create a newNewVehiclePriceMessageincluding the pricing information, and publish it to the message bus.
Here’s the complete code. (Note that we’ve also added some code for reading our configuration from the appsettings.json file; you’ll need to add this to your project and set “Copy to Output Directory” to “Copy if newer” )
using Autobarn.PricingServer;
using Grpc.Net.Client;
using System;
using System.IO;
using System.Threading.Tasks;
using Autobarn.Messages;
using EasyNetQ;
using Microsoft.Extensions.Configuration;

namespace Autobarn.PricingClient {
	class Program {
		private static readonly IConfigurationRoot config = ReadConfiguration();
		private const string SUBSCRIBER_ID = "Autobarn.PricingClient";
		private static Pricer.PricerClient grpcClient;
		private static IBus bus;

		static async Task Main(string[] args) {
			var channel = GrpcChannel.ForAddress(config["AutobarnPricingServerUrl"]);
			grpcClient = new Pricer.PricerClient(channel);

			bus = RabbitHutch.CreateBus(config.GetConnectionString("AutobarnRabbitMQ"));
			await bus.PubSub.SubscribeAsync<NewVehicleMessage>(SUBSCRIBER_ID, HandleNewVehicleMessage);
			Console.WriteLine("Connected! Listening for NewVehicleMessage messages.");
			Console.ReadKey(true);
		}

		private static async Task HandleNewVehicleMessage(NewVehicleMessage incomingMessage) {
			var request = new PriceRequest {
				ModelCode = incomingMessage.ModelCode,
				Color = incomingMessage.Color,
				Year = incomingMessage.Year
			};
			var reply = await grpcClient.GetPriceAsync(request);
			var outgoingMessage = incomingMessage.ToNewVehiclePriceMessage(reply.Price, reply.CurrencyCode);
			await bus.PubSub.PublishAsync(outgoingMessage);
		}

		private static IConfigurationRoot ReadConfiguration() {
			var basePath = Directory.GetParent(AppContext.BaseDirectory).FullName;
			return new ConfigurationBuilder()
				.SetBasePath(basePath)
				.AddJsonFile("appsettings.json")
				.AddEnvironmentVariables()
				.Build();
		}
	}
}
Here’s the contents of appsettings.json:
{
  "ConnectionStrings": {
    "AutobarnRabbitMQ": "amqp://user:pass@localhost:5672"
  },
  "AutobarnPricingServerUrl" :  "https://localhost:5003"
}
Autobarn.Notifier
Next, we’re going to modify the Autobarn.Notifier service so that it subscribes to the message queue and listens for NewVehiclePriceMessage messages. When a NewVehiclePriceMessage arrives, the notifier will translate this into a SignalR notification and push it to the SignalR hub.
We’ll need to install the EasyNetQ NuGet package, the packages we need to use appsettings.json for our configuration, and the Newtonsoft.Json serializer. From the Autobarn.Notifier folder, run:
dotnet add package EasyNetQ
dotnet add package Microsoft.Extensions.Configuration
dotnet add package Microsoft.Extensions.Configuration.EnvironmentVariables
dotnet add package Microsoft.Extensions.Configuration.FileExtensions
dotnet add package Microsoft.Extensions.Configuration.Json
dotnet add package Newtonsoft.Json
Now we need to modify our Program.cs to subscribe to messages, translate those message into SignalR notifications, and push them to our SignalR hub. Rather than mapping them into a different message type, we’ll just JSON-encode the NewVehiclePriceMessage and push the JSON document to the SignalR hub, where we can broadcast it to all connected web browsers and then rely on our client-side JavaScript code to deserialize and format it.
Here’s the code:
using Microsoft.AspNetCore.SignalR.Client;
using System;
using System.IO;
using System.Threading.Tasks;
using Autobarn.Messages;
using EasyNetQ;
using Microsoft.Extensions.Configuration;
using Newtonsoft.Json;
using Newtonsoft.Json.Serialization;

namespace Autobarn.Notifier {
	class Program {
		private static readonly IConfigurationRoot config = ReadConfiguration();
		private static HubConnection hub;
		private static IBus bus;
		private const string SUBSCRIBER = "Autobarn.Notifier";

		static async Task Main(string[] args) {
			JsonConvert.DefaultSettings = JsonSettings;

			hub = new HubConnectionBuilder().WithUrl(config["AutobarnSignalRHubUrl"]).Build();
			await hub.StartAsync();
			Console.WriteLine("Connected to SignalR Hub.");
			bus = RabbitHutch.CreateBus(config.GetConnectionString("AutobarnRabbitMQ"));
			await bus.PubSub.SubscribeAsync<NewVehiclePriceMessage>(SUBSCRIBER, HandleNewVehiclePriceMessage);
			Console.WriteLine("Connected to message bus. Listening for NewVehiclePriceMessages.");
			Console.ReadKey(false);
		}

		private static async Task HandleNewVehiclePriceMessage(NewVehiclePriceMessage message) {
			var json = JsonConvert.SerializeObject(message);
			Console.WriteLine($"Sending JSON to hub: {json}");
			await hub.SendAsync("NotifyWebUsers", "Autobarn.Notifier", json);
			Console.WriteLine("Sent!");
		}

		private static JsonSerializerSettings JsonSettings() =>
			new JsonSerializerSettings {
				ContractResolver = new DefaultContractResolver {
					NamingStrategy = new CamelCaseNamingStrategy()
				}
			};

		private static IConfigurationRoot ReadConfiguration() {
			var basePath = Directory.GetParent(AppContext.BaseDirectory).FullName;
			return new ConfigurationBuilder().SetBasePath(basePath)
				.AddJsonFile("appsettings.json").AddEnvironmentVariables().Build();
		}
	}
}
You’ll also need to add an appsettings.json file to the Autobarn.Notifier project:
{
  "ConnectionStrings": {
    "AutobarnRabbitMQ": "amqs://user:pass@localhost:5672"
  },
  "AutobarnPricingServerUrl": "https://localhost:5003",
  "AutobarnSignalRHubUrl": "https://localhost:5001/hub"
}
That’s it.
To see our whole system in action, we’ll need to start all the following services:
- Autobarn.Website
- Autobarn.PricingServer
- Autobarn.Notifier
- Autobarn.PricingClient
- Autobarn.AuditLog
Once all your services are running, add a new vehicle to the system by making an HTTP POST request to the Autobarn.Website’s /api/vehicles/ endpoint, and you should see each component in turn pick up the appropriate message, relay it to another service, and eventually display a notification popup in your web browser.